
How to Plan an ESD Workstation for Electronics Assembly: Layout, Grounding, and Storage Essentials
Electronics assembly environments demand strict electrostatic discharge (ESD) control to protect sensitive components from damage. Planning an effective ESD workstation involves more than placing an anti-static mat on a table—it requires integrating grounded work surfaces, organized tool storage, and material handling equipment into a cohesive production layout.
This guide addresses the core question: how to plan an ESD workstation for electronics assembly that balances component protection, operator efficiency, and 6S management standards.
Who Needs a Dedicated ESD Workstation?
ESD workstations are essential for:
- Electronics manufacturers assembling PCBs, semiconductors, or consumer electronics
- Electrical appliance producers handling control boards and sensitive wiring
- Automotive electronics teams working on ECUs, sensors, or infotainment modules
- Testing and repair labs diagnosing component-level failures
- Vocational training centers teaching proper ESD handling procedures
If your operation involves components rated below 100V HBM (Human Body Model) sensitivity, a controlled ESD workstation is not optional—it is a production requirement.
Core Components of an ESD Workstation
1. Anti-Static Workbench Surface
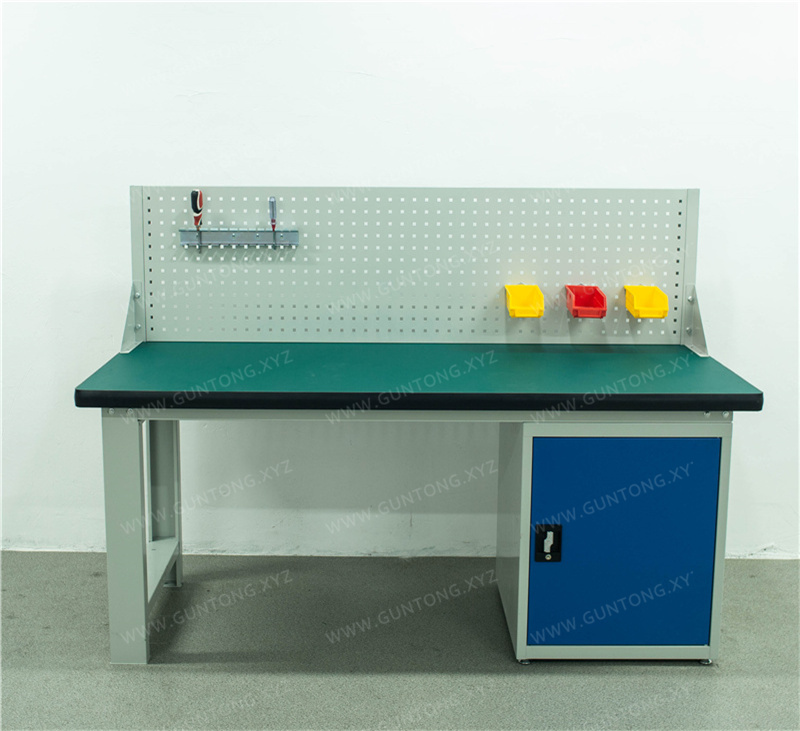
The workbench top is the primary contact point for sensitive components. Anti-static workbenches typically feature:
- Composite desktop structures with conductive or dissipative surface layers
- Grounding points connected to a common earth ground
- Load capacity matching your assembly requirements—standard configurations support 1000kg total load with C-type cold-rolled steel frames (100×50×1.5mm C-steel legs)
- Common dimensions: 1500×750×800mm, 1800×750×800mm, or 2100×750×800mm for single-operator or dual-operator setups
The 50mm thick green composite desktop provides both durability and static dissipation, suitable for prolonged assembly tasks.
2. Grounded Tool Storage
Tools must be stored within the ESD-protected area to prevent charge generation during retrieval. Options include:
- Pegboard storage cabinets with inner half-pegboard configurations—upper interior shelving combined with dual pegboard layouts on cabinet doors for visual tool management
- 4-drawer tool carts with pegboards offering tiered drawer storage (100mm and 200mm drawer heights) plus a 500mm square-hole pegboard for frequently used instruments
- Drawer load capacity: 80kg per drawer ensures stability when storing heavier calibration tools or soldering stations
All storage units should maintain electrical continuity with the workstation ground when positioned within the EPA (ESD Protected Area).
3. Material Flow and Turnover
Electronics assembly requires organized component flow from inventory to workstation. Consider:
- Lean pipe systems for gravity-fed component bins
- Turnover racks for sub-assembly staging
- Automated storage and retrieval system (AS/RS) accessories for high-volume tote-based material delivery, supporting 50–100kg per tote with rack heights up to 12 meters
Planning Steps: From Layout to Implementation
Step 1: Define Your EPA Boundary
Map the physical area where ESD-sensitive components are exposed. This boundary determines:
- Workbench placement and quantity
- Storage cabinet locations
- Grounding infrastructure requirements
- Personnel entry points with wrist strap testers
Step 2: Select Workbench Configuration
Match workbench type to task:
| Task Type | Recommended Configuration |
|---|---|
| PCB assembly | Single back panel workbench with 4-drawer under-bench storage |
| Inspection and testing | Workbench with pegboard back panel for instrument mounting |
| Rework and repair | Dual-layer workbench with drawer and hanging board combination |
Step 3: Integrate Storage Within Reach Zones
Position tool cabinets and carts within the operator's primary reach zone (approximately 400–600mm from seated position). The 4-drawer 1-door tool cart with pegboard (1000×500×850mm overall) fits standard aisle widths while providing immediate access to hand tools and measurement devices.
Step 4: Verify Grounding Continuity
After installation, test:
- Workbench surface resistance (typically 10⁶–10⁹ ohms for dissipative surfaces)
- Ground connection resistance from each workstation component to common earth
- Wrist strap and footwear testing at EPA entry points
Implementation Boundaries and Risks
What ESD Workstations Cannot Solve Alone
- Environmental humidity: ESD control requires 40–60% relative humidity; workbenches do not compensate for dry environments
- Operator training: Grounded equipment is ineffective if personnel bypass wrist straps or wear non-ESD footwear
- Packaging materials: Components must arrive in ESD-shielded packaging; open cardboard boxes introduce charge risks
Customization vs. Standardization Trade-offs
Standard workbench dimensions (1500mm, 1800mm, 2100mm lengths) offer faster delivery and lower cost. Non-standard customization—such as integrated conveyor sections, specialized cutouts for test fixtures, or stainless steel surfaces for cleanroom-adjacent areas—requires longer lead times but may be necessary for specific production flows.
Guang'ErMei Precision Components supports both standardized production and non-standard customization, with on-site workstation planning and load-bearing design services for manufacturing facilities in Huizhou, Guangdong Province, and nationwide delivery.
Next Steps for Workstation Planning
- Audit your current EPA layout: Identify gaps between existing workbenches and actual assembly requirements
- Document load requirements: Calculate maximum weight per workbench based on equipment and component staging
- Request on-site assessment: Professional workstation planning should account for operator movement, material flow, and grounding infrastructure
- Phase implementation: Roll out ESD workstations in priority areas first, validate effectiveness, then expand
For electronics manufacturers evaluating workstation upgrades, the combination of anti-static workbenches, organized tool storage, and proper grounding infrastructure forms the foundation of reliable ESD control.